Sunday, October 26, 2014

May Your Holidays Sparkle!


I have another Christmas card to share today!  Today, I am playing along with Freshly Made Sketches.  I love this clean and simple design.  I realized the other day that I normally have way more Christmas cards ready by this time of the year.  I only have a few so my focus this past week has been to make Christmas cards!  


I started with MFT Card Stock Sampler pack.  I am using smooth white, gumdrop green, and black licorice.

I used Blueprints 13 to cut the gumdrop green background.  I stamped this panel with MFT Fine Chevron background stamp in versa mark.   I die cut the black licorice with MFT Pierced Square Stax.  I stamped this panel with white pigment ink using two sentiments from Seasonal Sentiments.  I stamped two little snowflakes from Christmas Cuteness stamp set in the corners.


Next, I die cut and stamped the santa from Christmas Cuteness die namics and Christmas Cuteness stamp set.  I colored the santa using copics.  I finished my card with a few clear gems for added sparkle!

As always thanks so much for stopping by!

Betty 

Merry Little Christmas!


https://blogger.googleusercontent.com/img/b/R29vZ2xl/AVvXsEhH3QI-rtaPbcCazXqVnKIxH_JBWT3PLDBJ8Z2S30vmPvg3nZnXf6Opwf9TmESUp_mP5Qow6MA0JcB8yzDCjWEGqltT-ThppGfoEdzLuJQPS7rCZnLUBcHmKa17IQ5R2V_MOt15nxQfepg/s1600/Challenge+%2347++10.19.14++Inspiration+photo+-+snowglobe.jpgI made another Christmas card.  I am playing along with Christmas Card Challenges Inspiration Challenge.  

I started with MFT Card Stock Sampler pack.  I am using paver red, steel gray,  berrylicious, gumdrop green, chocolate brown, and smooth white.  

I created a 5 inch card base with the paver red.  I used Blueprints 14 to die cut the steel gray layer.  I stamped this panel with MFT Sheet Music background stamp in versa mark.  I die cut a large circle in  berrylicious then edge with the Stitchable Dot Circle dienamics.  I stamped this circle with MFT Snowfall background stamp.  I used the MFT Stitched Snowdrifts and layered some snow inside this circle frame.  I softly sponged with MFT grout gray premium ink  for added dimension.   

Next, I die cut the Christmas Tree Cutout in gumdrop green.  I stamped each section with the tree sentiment in Seasonal Sentiments stamp set.  When I got to the top, I had to improvise a bit and freehand cut a larger triangle.  I like that it is not perfect and I love the finished look!  I finished my card with a few clear gems.  I am also playing along with Christmas Cards All Year 'Round "Embellish It" Challenge.

As always thanks so much for stopping by!

Betty 

Saturday, October 25, 2014

Peace, Love, and Joy!


Catered Crop Recipe Swap ButtonI have been working on some Christmas cards this afternoon.  I am playing along with The Catered Crop inspiration challenge. 


touchdown

 I started with MFT Card Stock Sampler pack.  I am using black licorice, smooth white, blue raspberry, electric red, and gumball green. 

I stamped the black licorice with MFT Striped Background stamp in a pigment white ink.  I am playing off of the referee stripes.  Then, I die cut the Peace, Love, Joy dienamics.  I stamped the Peace with MFT Sheet Music background stamp in MFT blu raspberry premium ink.  I stamped the Love in MFT Chevron background in MFT Electric Red premium ink, and the Joy die with MFT Romantic Script background in versamark.  I cut each of the words twice and layered for added stability.  


Next, I die cut the smooth white card stock with MFT pierced rectangle stax.  I  placed the sentiments and die cut in black licorice the script MFT ampersand die namics.  

To complete the card I used MFT sequins die namics and die cut some sequins in mirror gold card stock.

As always thanks so much for stopping by!

Betty

PTI October 2014 Blog Hop!


Blog-hop-logo


Inspiration 4
I am playing along with  PTI October 2014 Blog Hop!  I chose this inspirational photo and color combination.

PTI-Oct-Blog-Hop-Color-1


I started with PTI card stocks and inks.  I used PTI Vintage Ornament Collection dies.  I die cut the longest die in the set in coordinating card stock colors.  I stamped each with coordinating ink.  I used the sunburst from the Shaker and Sprinkles Monthly Moments Kit.  The tiny dotted image comes from Feather Finery stamp set. 

 
I placed the ornaments on the card.  I used some silver cording to replicate hanging ornaments.  The Merry Christmas sentiment comes from Big and Bold Holiday Wishes stamp set.  I finished my card with a few clear gems.  I am playing along with this week's Merry Monday Christmas Challenge.  


As always thanks so much for hopping by!

Betty

Thursday, October 23, 2014

You Warm My Heart!


Print  
I am playing along with this week's MFT Weekly Sketch Challenge and The Color Throwdown.  I just love these warm colors and this fun sketch!


For my card, I started with MFT Card Stock Sampler.  I am using Primitive Cream, Factory Green, and Tangy Orange.   I cut the background factory green using Blueprints 16.   I used Proof Positive Cover Up to cut the top portion.  I cut this cover up using factory green and primitive cream card stocks.  I stamped the factory green panel with Fine Check background using versamark.  I inked the edges with versamark as well.  I inlaid the primitive cream proof positive pieces to mimic the sketch.   I love how it turned out.  It looks like a warm quilt pattern.


Next, I die cut the deer from Christmas Cuteness dienamics.  I stamp the deer from the coordinating Christmas Cuteness stamp set.  I used MFT Hybrid Ink Black Licorice ink pad.  I colored with copics.  I added a few touches of gold glitter to the antlers.  

For the sentiment, I die cut the double ended stitched fishtail die from Blueprints 2.  I stamped the sentiment from LLD Perk Up stamp set.  I used some soft yellow ink to stamp the stitched swirl image onto the sentiment panel to add some extra whimsy.  I die cut the tiny heart in tangy orange card stock using the smaller heart image from LLD Coffee Cup die namics.    I added some richness to the tangy orange heart using versamark.  

Sunday, October 19, 2014

Merry Christmas!


Happy Sunday!  Popping in with another Christmas card!  I am playing along with this week's PTI Make It Monday Challenge...Gold Dipped die cuts.  

I usually have a stash of Christmas cards ready to go by this time of the year.  I was looking the other day and realized I have very few Christmas cards made.  I am trying to knock out a few this week.  


I started with pure poppy base.  I die cut the large frame from Fabulous Frames 3 times and glued together.  I stamped the sentiment from the Polka Dot Parade set before I glued all the panels together.  I die cut the Polka Dot Parade #9 die twice.  I stamped each section of the tree with coordinating image from the Polka Dot Parade #9 stamp set.  I used chartreuse, poppy, hibiscus burst, harvest gold, and limeade ice.  I used dark chocolate
for tree trunk base.   I swiped each piece at the scalloped edge with versa mark and gold embossed.  I glued all the pieces to a strip of card stock and glued to the back side of the fabulous frame.  I actually inked the entire tiny star and gold embossed the whole thing.  I popped the entire frame and tree using foam tape.  I added a few shiny sequins and my card was complete.  

While this card is mailing friendly and looks clean and simple, it is still labor intensive for mass producing.   I am using the sketch from this week's Retro Sketch.  

This challenge reminded me of the card I did for PTI June 2013 Blog Hop!  Check out the post Thinking of You.....memories!


As always thanks so much for stopping by!


Betty

Saturday, October 18, 2014

JOY!


PrintI have another Christmas card to share this week!  I am playing along with this week's MFT Weekly Sketch Challenge.   I finally had a chance to play with my new MFT Goodies!  They arrived yesterday, but all I could do was look at them from a reclined position.  I have had a sciatica nerve issue this week with pain shooting down my left leg and muscles clenching.  I have never had this problem before.  Sciatica does not play!   

More about my sciatica nerve issue here...or skip it and go to card details below!  It got to the point by Thursday morning that I could barely stand without shooting pain going down my left leg.  The muscle would grab and hold.  It was awful!   I had to leave work Thursday which is rare for me as I usually miss for family before I miss for myself.  I have been in bed for two days trying to take it easy per my chiropractors orders.  By the way...chiropractors rock!   I go back to the doctors again on Monday.  Between taking it easy and alternating hot and cold packs, I was finally able to sit without pain late last night.  I figured I could sit at my craft desk just as easily as sitting anywhere.  Now, I must take it easy and not do housework or laundry....full mobility things, but sitting at my craft desk helped me to relax. Anyway, I am still on the mend!  I hope to be able to stand for any length of time soon since I am going to try and go back to work Monday!  I teach so walking, standing, stair climbing are all part of the job!    If you have this problem, I would LOVE to hear what you do to fix it as well as keeping it from flaring up again.

  
For my card, I started with the MFT card stock sampler!  I used sno cone, black licorice, and smooth white.  I stamped the snow cone  panel with Snowfall Background stamp using white pigment ink.  I sponged the edges with some Sno Cone Premium dye ink as well as some white pigment ink for added depth and effect. Next, I die cut the smooth white panels using the to larger angled dies from Blueprints 18.  Then, I placed the two of the Stitched Snowdrift dies on the tops of the angles and die cut.  LOVE how easy it is to get this cool stitched layer edging!  I softly sponged each stitched portion with some Grout Gray premium dye ink.  Creates some very subtle depth and dimension.

First of all, when I saw the new MFT Pierced Snowflake dies, I think I gasped at the computer screen!   When I got them in the mail yesterday, I was even more blown away!  These snowflakes are so beautifully detailed!  I used the smaller of the three on my card!  I die cut using some silver mirror card stock.  Next, I used Peace, Love, Joy die  to cut the word JOY using some red glitter card stockI cut this die two more times using some scrap white card stock and glued all three pieces together for some added stability.

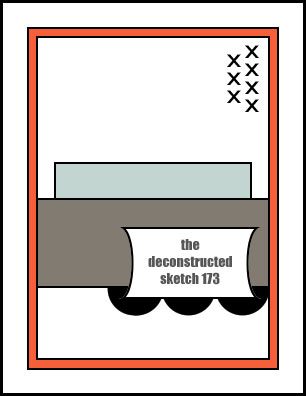
For the tab at the top of the sketch, I used the tab die in Blueprints 18.  I die cut this using some black licorice card stock.  I used some white pigment ink to sponge the edges.  I topped this piece off with a red glittered button cut from the button die in Blueprints 18.   I topped the button with a silver corded bow. I was not finished with the Blueprints 18 yet, though.  I used the pierced row of holes die to cut the bottom detailing to follow the sketch design.  This card came together pretty quickly.  I am also playing along with this week's Festive Friday Challenge #42  inspiration and with Merry Monday Christmas "Silent Night" theme.   

As always thanks so much for stopping by!

Betty

Verve's October Release Retrospective Blog Hop!


 Welcome to Verve's October Release Retrospective Blog Hop! The Verve Divas are hopping today and serving up some more inspiration using the October release stamps & dies! Besides a look-see at some really nifty cards, there's also a comment prize up for grabs!


For my card I started with Pebbles Walnut Grove designer papers.  I combined the newly released Inspire Hope stamp set with Verve's Love Notes stamp set.   I die cut Verve's Classy Label Cut Above Die in rustic white card stock.  I inked the frame from Love Notes stamp set.  I stamped the sentiment, leafy frame, and floral center from the Inspire Hope set.  Love the many options with the floral frames and sprigs that come in this set.  

Deconstructed Sketch No. 173
I am playing along with this week's Deconstructed Sketch 173.   This sketch called for three circle elements in the bottom right corner peeking from the horizontal panel.  In order to create those, I used the larger of Verve's Cut Above Loopy Blooms dies.  I cut the larger bloom in half.  I added some ink distressing for dimension, some sewing machine stitching for some added detail.  I finished the card with the iridescent sequins from the newly released Verve's Pink Sparkle Sequin Mix.  


1. Julee8. Laurie
2. Stacey9. Christyne
3. Marisa10. Teresa
4. Chaitali11. Andrea
5. Amber12. Betty
6. Jen13. Sarah
7. Charmaine14. Maureen


Want to win some shiny new Verve? We're giving away a $40 gift voucher to one lucky commenter along the hop, so be sure to leave a shout out in the comments as you hop about.


As always thanks so much for hopping by!

Betty


Monday, October 13, 2014

Joy to the World!


I have a card to share!  I have been asked to join the SCS Color Challenge Team to celebrate the 500th Color Combo Challenge at Splitcoaststampers!  It seems like yesterday I started playing along with the color combo challenges.  Then, I started hosting!  After a couple of years, I turned the reigns over.   Now, we are all back again for the CC500 Celebrating Stamping through the Seasons with Four Color Combos to choose from!  Check out the SCS CC500 post for more information.  

I chose the Winter Combo!  For my card I am also using the Mojo Monday Sketch.  I combined these beautiful colors to create a Christmas card!   I die cut the vertical panels using each of the four colors in the combo.  I stamped these panels with the snow background border in Verve's Snow Wonderful stamp set.  I stamped the sentiment using Verve's Joy to the World Plain Jane!  In addition to the sentiment itself, I  just love the size and font.  I used some MFT electric red ink.  I then used some PTI soft stone ink to stamp the sentiment again to add some shadow stamping effect.  Makes the sentiment have some added dimension.

Next, I die cut Verve's Award Banner Trim Cut Above die in white, cherry, and olive.  I used the white for contrast then filled in the circle openings alternating between cherry and olive.  Love this effect as well.  I added some silver cording and finished my card with a few touches of silver sequins from Verve's Signature Sequin Mix. 

 As always thanks so much for stopping by!

Betty
 

Sunday, October 12, 2014

NUTS about You!


http://www.mftstamps.com/blog/wp-content/uploads/2014/10/MFT_ColorPaletteChallenge_PaintBook_10.jpgHappy Sunday!  I have a fun card to share today!  I am playing along with this week's MFT Color Palette Challenge.  I just love these rich fall colors.  

I started with MFT Card Stock Sampler Pack.  I used whipped cream, smooth white, natural, hot fudge, olive, brick red, and safety orange.  I started with a natural base.  I decided to use MFT  Horizontal Stitched Strips.  I used each of the colors in the color palette for each one of the colors.  I then used Gingham Background stamp in versa mark to stamp all 4 panels.  I inked the edges of each panel with versa mark to add some depth and dimension.  

I then die cut a Pierced Circle Stax using natural card stock.  I stamped the sentiment from Cute Critters.  I used the MSTN Cute Critters die namics.  I die cut and stamped a few of the acorns from the set.  I colored the acorns with Copics.   I stamped the sentiment and lightly ink distressed the edges of the pierced circle stax.  I layered the acorns. 

Next, I used Blueprints 12 and Blueprints 14 to create the little fishtail detail with button at the top corner.  I layered the paper button and tied it with some hemp cord. 
I finished my card with a few brown sequins.  Playing along with Simon Says Monday Challenge.....Falling in love with....

As always thanks so much for stopping by!

Betty


Saturday, October 11, 2014

Thank You!


PrintHappy Saturday!  I had a chance to play in my craft room today in between laundry loads and general cleaning.   I combined three challenges for this card.  I am playing along with this week's MFT Weekly Sketch Challenge.  I am using the colors from this week's Color Throwdown, and the Inspiration from Fusion Card Challenge.

I started with MFT Cardstock Sampler pack.  I used grout gray, smooth white, sour apple, lemon drop, and grape jelly.  I used grout gray for the base.  I die cut the white panel using  Blueprints 15   for stitched edging.  I stamped this panel with MFT Woodgrain background stamp in grout gray premium ink.  I ink distressed the edges just a little for some added dimension.  

For the grape jelly panel, I used the large stitched panel in Blueprints 13 then cut it again for a stitched wonky panel.  I stamped the panel on a slight angle using Fine Check Background stamp and Cheesecloth Background stamp using versamark.  I sponged the versamark around the edges to create a richer grape jelly effect. 

I really love the floral arrangement with the Fusion Challenge and just knew I had to play with some flowers dies to sort of recreate the look.  I die cut the sour apple using MFT Leaf-Filled Flourish.  I inked distressed the edges using versa mark to intensify the color of the leaves for added effect.  I used MFT Flower Medley die namics to die cut the 8 petal die with smooth white card stock. I cut them several times and layered.  I cut the center using the spikey center die that comes in the same die set.  I used sour apple card stock because the flower centers in the inspiration piece look like they have a touch of green around the edges.  I used Blueprints 12 to die cut the lemon drop centers.  I used some orange ink to slightly ink the edges for added dimension.  I also needed a touch of orange to comply with The Color Throwdown Colors.  I hope this is enough orange!  

I used another piece of grout gray card stock to die cut the stitched double ended fishtail banner from Blueprints 2.  I used the sentiment from LJD Out on a Limb stamp set!  The thank you was a perfect fit! 

I finished my card with a few sequins and some tiny clear gems.  I love how it turned out!

As always thanks so much for stopping by!

Betty


Wednesday, October 8, 2014

I'm thinking of you!


Happy Wednesday!  I am playing along with this week's Retro Sketch Challenge.  This week we got to choose a favorite from past sketches.   I chose this one.  


For my card I  started with some kraft card stock and Pebbles Lakeside designer papers.  I love this floral print.  I ink distressed the edges.    I am using Verve's Take Note stamp set along with Verve's Rounded Scallop Frame Cut Above die set.  I stamped the envelop onto the inner cut out portion.  Then, I ran it through again to cut away the excess.  I fussy cut the pencil and colored with copics.  I added a few die cut hearts using Verve's From the Heart die set.   I finished with some buttons and a clip.  

As always thanks so much for stopping by!

Betty

© The Things I Do With Paper. Made with love by The Dutch Lady Designs.